User Guide Keyframe Animation 1.9
New ! Keyframe Animation 2.2 New !
Free Upgrade! Get lots of new features.
Overview
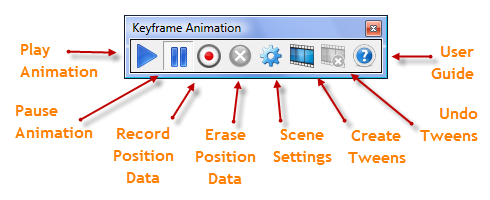
The main features of Keyframe Animation 1.9 are conveniently located on the toolbar to facilitate your workflow.
 |
Play Button | Turns the animation on so objects move when a scene is selected. |
 |
Pause Button | Turns the animation off so objects don't move when a scene is selected. |
 |
Record Button | Saves the position data of objects on the current scene. (Disabled if there are no scenes.) |
 |
Erase Button | Deletes the position data of all selected objects on every scene. (Disabled if no objects are selected.) |
 |
Scene Settings | Toggles the display of the Scene Time Settings window. The Scene Time Settings window lets you set the transition time and delay time for each scene. |
 |
Make Tweens | Opens a new model and generates SketchUp scenes, called tweens, that interpolate the animation in between the keyframes. The tweens are used for exporting your animation to a movie directly from SketchUp. |
 |
Undo Tweens | Undo the tweens by restoring the original keyframe model. (Enabled only in the tweens model.) |
 |
Help Button | Opens up the User Guide (the page you are viewing now) in your browser. |
The menu is at Plugins/Extensions > Keyframe Animation. All the toolbar features are also accesible from the menu. The other items on the menu are:
| Toolbar | Toggles the toolbar visibility. You can also access the toolbar from View > Toolbars > Keyframe Animation. |
| About | Opens a window to display your license status or free trial status. Allows you to register a license or remove a license from this computer. |
| Download | Opens the Keyframe Animation Download page in your browser. Useful if you want to upgrade to the newest version. |
| Purchase | Opens the Keyframe Animation Purchase page in your browser. This item is not shown if a license has been registered. |
| Register | This opens the Keyframe Animation About dialog where you can register a license serial number. This item is not shown if a license has been registered already. |
Tip: Mac Toolbar Issues
If you are on a Mac, there is a frequent issue with the toolbar buttons not showing the state correctly. Better to use the menu items. Then it is easy to tell if the animation is turned on or off. A checkmark next to the menu item shows if Play or Pause is the active state.
Creating an Animation
There are seven easy steps to set up an animation and get your objects moving.
Step 1 - Group Geometry

First of all, convert any geometry that you want to animate into groups or components. Ungrouped geometry can not be animated.
To check the type of something, select it, right-click, and choose Entity Info (context menu right-click > Entity Info)
It doesn't make any difference, for animation purposes, whether something is a group or a component. So, we will refer to them generically as objects.
Step 2 - Add Scenes
Add some scenes. You can use the Scenes Manager for this (menu item Window > Scenes).
Each scene is essentially a keyframe. You can add more scenes later, delete scenes, or change their order. To run an animation in reverse, just reverse the order of the scenes.
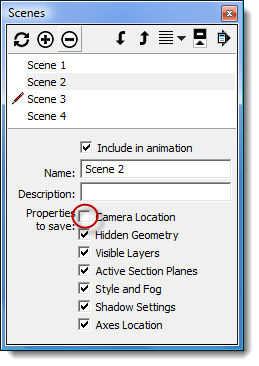
SketchUp will animate the properties saved with a scene. Keyframe Animation will animate the objects that are recorded on a scene.
Keyframe Animation 1.x only supports the Camera Location and Visible Layers scene properties. The other properties are ignored when the tweens are generated.
If you want to animate the camera, check the Camera Location box for each scene.
Keyframe Animation 1.x, only supports the Perspective camera. The Parallel Projection camera is NOT compatible with the tweens. You can approximate a Parallel Projection camera by using a Perspective camera with a very narrow Field of View.
Objects can be made visible or hidden by putting them on layers, and then turning those layers on or off for each scene. This allows you to make objects appear or disappear at any point in the animation. When the tweens are created, the objects on them will have the appropriate visibility, so the animation can be exported to a movie.
Tip: Camera Location
If you are creating an animation where the camera does not move, leave the Camera Location box on each scene unchecked. This way, if you want to change the perspective you view the animation from, you can change it on-the-fly, for all the scenes at once, without having to update the Camera Location property on each scene.
New in version 2.1: Support for all scene properties.
Keyframe Animation 2.1 is compatible with all the scene properties. You can combine SketchUp's built-in animation of any scene property, with Keyframe's object animation, and export it all to a video.
New in version 2.1: Support for all cameras.
Keyframe Animation 2.1 plays nice with all of the camera animations in SketchUp. This includes Perspective camera, Parallel Projection camera, and changes in the camera's Field Of View.
Step 3 - Select a Scene
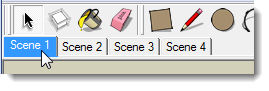
Select the first scene by clicking on the scene tab. The tab becomes highlighted.
The scene with a highlighted tab is referred to as the current scene.
You can change which scene is the current one by clicking on different tabs, or by double-clicking on the scene name in the Scenes Manager.
Step 4 - Position Objects
Now use the Move Tool  ,
the Rotation Tool
,
the Rotation Tool  ,
or the Scale Tool
,
or the Scale Tool  ,
to position and/or resize the objects on the current scene.
,
to position and/or resize the objects on the current scene.
Step 5 - Record Objects
Click the Record button on the toolbar to save the position data for the objects on the current scene.
It doesn't make any difference whether the Play button or the Pause button is currently selected.
The bell will beep to indicate that the position data was recorded.
Tip: Mac Bell Sound Issue
People have complained that the "bell" on the Mac sounds like the "you just did something wrong, stupid" sound. But, if you hear anything at all, that means the position data was recorded.
If nothing is selected, then all the top-level objects will be recorded. Top-level means the objects in the active context. Usually that means the objects in the model. But, if you have a component open for editing, then it is the objects contained in that component.
If you want to have more control over which objects are recorded, then select them first. If any objects are selected, then only those objects will be recorded.
Record overwrites the old position data. To revise an animation, just move the objects to new positions and click record.
The Erase Button is kind of the opposite of Record.
It deletes the position data of all selected objects on every scene.
It is useful if you want to take a moving object out of the animation and make it stationary.
Step 6 - Repeat for each Scene
That is the basic workflow. Just repeat steps 3, 4, and 5 for each scene.
Step 7 - Play the Animation
To turn object animation on, click the Play button on the toolbar.
When a scene is selected, the objects will automatically move to their recorded positions for that scene.
To turn the animation off, click the Pause button on the toolbar.
The objects will remain stationary when you select a scene.
You can test out the animation by selecting one scene at a time to initiate each scene transition. Or run a slideshow of the whole animation (View > Animation > Play).
Tip: What to do if objects don't move.
If your objects are not moving, here are some steps to diagnose the cause.
- Check if the Play Button is toggled off. Object animation is turned off by default when SketchUp opens. You have to turn it on by clicking the Play button.
- Make sure it is a group or component. Loose Geometry can not be recorded or animated. Use the Entity Info window to check the type (context menu right-click > Entity Info).
- An object will not move if there is no position data saved on the scene for it. Click the Select Button to see which objects have positon data saved on the current scene.
- If the object still doesn't move, maybe the position saved is the same as where it's at already. Try moving it somewhere else, and then select the scene tab. It should move back.
Types of Interpolation
There are three types of interpolation depending on whether you Move ,
Rotate ,
or Scale
the objects.
Things can get more complicated if you combine the operations.
Note that Rotations are always interpolated through
the smallest angle between the object's orientation on one scene and the next.
So, the angle will always be less than or equal to 180 degrees.
If the angle is exactly 180 degrees, the direction is ambiguous, so the object could rotate either way.
A rotation
and a translation can not be combined, in general.
However, if the translation is parallel to the axis of rotation, then Keyframe Animation will interpolate it correctly.
For the other situations, it is possible to combine a translation with a rotation by
animating nested objects.
You can translate
and scale an object at the same time.
Keyframe Animation will always interpolate this correctly.
A scale
and a rotation can usually be combined.
If the point scaled about lies on the axis of rotation, then Keyframe Animation will interpolate it correctly.
If they are different, the interpolation will use a fixed point in between to both rotate and scale about.
If you want to scale about one point, while rotating about a different point,
you can do that by animating nested objects.
Bug: Negative scale factors.
When scaling an object, you can shrink it down to almost zero. But if you go past that, the scale factor becomes negative. Scaling by a negative scale factor is buggy in version 1.9.
Bug: Reflections.
SketchUp allows you to reflect an object by flipping it along the red, green, or blue axis. (e.g. Context menu right-click > Flip Along) Reflections are buggy in version 1.9 because they involve scaling by a negative factor (-1).
New in version 2.1: Reflections.
Keyframe Animation 2.1 fixes the reflection bug, and the negative scale factor bug.
Animating Nested Objects
Keyframe Animation allows you to animate subgroups (or subcomponents) to any depth. Subgroups (subcomponents) move relative to their parent. They inherit their parent's motion, and then apply their own movement relative to it. This allows you to compose translations, rotations, and scaling operations, in order to create more complex types of motion.
To record a subgroup (subcomponent), select it first, then click the Record button. Usually, the easiest way to select a nested object is with Outliner. The other way is to open the objects that contain it by successively double-clicking on them, until you can select the nested object. If nothing is selected when you click record, then the position data for all the subgroups (subcomponents) in the open parent object is recorded.
Time Settings
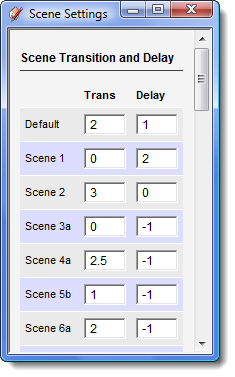
Click the Scene Settings button on the toolbar to display the Scene Settings dialog.
This allows you to fine tune your animation by specifying a value for both the transition time and delay time of each scene.
The transition time is the time it takes for the animated objects to move to their recorded positions when the scene is selected. The time is in seconds. A negative value will use the default transition time.
The delay time is the amount of time the animation will wait before beginning the transition to the next scene. The time is in seconds. A negative value will use the default delay time.
There is also a setting for the frame rate, which determines how many tweens are generated for each second of animation time. See the section on "Export a Movie" for more details.
All settings are saved as soon as the textbox loses focus. The bell will beep to indicate the value changed.
Export a Movie
Once you have your animation all set up, you may want to export it to a movie, or to a sequence of images. SketchUp has a built-in animation export utility. Unfortunately, it only exports the scene property animation, and ignores the object animation. However, Keyframe Animation has a workaround that solves this shortcoming. It creates many scenes in between the key frames, with copies of the animated objects (and camera) interpolated between their key frame positions. The in between scenes are called tweens for short. They can be generated for any frame rate (e.g. 10, 15, 25 frames per second). These tweens can export the object animation, one movie frame per tween, directly from SketchUp.
Tip: Limited Support for Scene Properties.
The tweens do not support all the properties that can be saved with each scene. The scene properties that the tweens do support are: Camera Location, and Layer Visibility.
New in version 2.1: Support for all scene properties.
In Keyframe Animation 2.1, the tweens support all the scene properties. You can combine SketchUp's built-in animation of any scene property, with Keyframe's object animation, and export it all to a video.
First, set a frame rate. It is in the Scene Settings dialog. The frame rate specifies how many tweens will be created for each second of transition time or delay time. The higher the frame rate, the smoother the interpolation.
To generate the tweens, click the Make Tweens button on the toolbar.
Tip: Export the Animation in Parts.
Before the tweens are generated, a message box will display the number of tweens that it is about to create. If the number is greater than 1200-1500 tweens, you should definitely cancel the operation. It will slowdown SketchUp to a crawl, and possibly crash it. Larger animations need to be broken up and exported in parts.
Since there are usually hundreds of tween scenes, it might take a minute or two generate all of them.

The tweens will be created in a new model. A dialog box will prompt you for a name and location to save the Tweens model. The default name is your key frame model name with ".tweens" appended to it.
Click the Undo Tweens button on the toolbar,
if you want to return to the original key frame model and make some adjustments.
It doesn't really undo the tweens; they are in a separate model, which you can save before you leave.
This just restores the original Keyframe model, so you can start over again where you left off.
Now run the SketchUp export utility to turn your tweens into an AVI movie on Windows, or a QuickTime movie on the Mac. Each tween will become one frame in the movie. The menu item is, File > Export > Animation. This brings up a Save As dialog box.
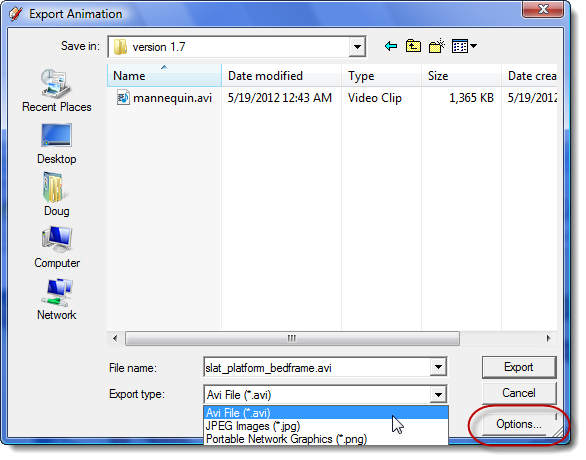
Notice the Export Type drop-down list.
If you would rather export the animation as a sequence of images,
then select .png or .jpg from the list, rather than .avi.
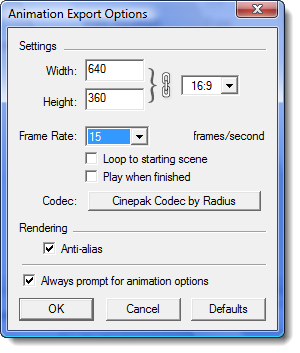
Be sure to click the Options button first. That will open the Options Dialog shown at the right.
Here are some things to note.
- You can control the image size and aspect ratio.
- If you want each tween to correspond to one movie frame, enter the same frame rate here that you specified when you created the tweens.
- Your choice of compression algorithms will depend on what is installed on your computer. For SketchUp 7 on Windows, the only choice is the Cinepak codec.
- Check the Anti-alias box.